Sunday, November 27, 2011
Vegtopia Has Moved!
After over two years using Blogger, I recently decided to buy some web hosting space, and, among other things, register a new domain for this here blog. Maybe it will even motivate me to update more often with recipes and book reviews!! The new link is: http://www.vegtopia.net/
Remember to update your RSS feed, as this one will no longer be updated. Our Facebook page will remain the same. Hope to see you soon at our new URL!
Tuesday, November 22, 2011
Apple Sage Stuffed Squash

Apple Sage Stuffed Squash
Serves 2.
Ingredients:
1 small onion, diced
2 cloves garlic, minced
4 tbsp olive oil
1 apple (golden delicious or other tart apple), diced
1/4 cup raisins (optional)
generous pinch of dried sage
1/2 loaf of stale bread, cubed
2 cups vegetable broth
1 acorn squash, halved and seeded
Directions:
- Preheat oven to 350 oF.
- Saute onion and garlic in 2 tbsp olive oil until translucent.
- Add apple, raisins and sage to the skillet. Simmer for 5 minutes.
- Add the bread to soak up the savory oils and stir in pan to coat.
- Add the vegetable broth to the skillet. Simmer for 5 minutes until most of the broth is absorbed or cooked off.
- Rub the halved and seeded acorn squash with 2 tbsp olive oil, and pack the cavity with the stuffing.
- Place the squash on a baking sheet and loosely cover with foil.
- Bake the squash 30-40 minutes or until squash is tender (can easily be pierced with a fork.)
- Serve with your favorite vegan gravy.
- Enjoy!
Sunday, September 11, 2011
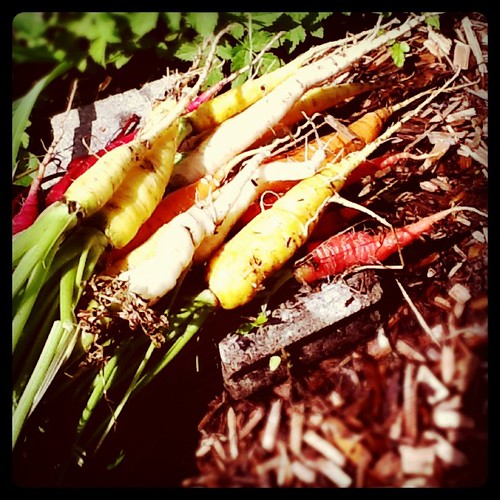 We're starting to see signs of autumn here in Boston, and Jeff and I went to do a first round of harvesting in our garden. For a last minute crop addition, our carrots were very successful. My mother got us these carrots from the Hudson Valley Seed Library, and we were pleased to see the carrots are all different colors. Unfortunately, I really dislike carrots unless they are cooked to make them no longer taste like carrots. I think we will pickle these with some daikon radish and ginger.
After Hurricane Irene, Jeff and I were pleased to discover that our garden came out unscathed. Sadly, the copious amounts of rain the following week have. Over saturated our garden, and made a lot of our tomatoes and peppers rot on the vine. Even so, this years crop is much bigger than last years haul of a few dozen green tomatoes. This year so far we've had eggplant, carrots, bell and cherry peppers, pole beans, and tons of tomatoes. Each year we learn something new. This autumn we are excited to plant some seed garlic we got from the Vermont Garlic Festival. We'll see how things go!
We're starting to see signs of autumn here in Boston, and Jeff and I went to do a first round of harvesting in our garden. For a last minute crop addition, our carrots were very successful. My mother got us these carrots from the Hudson Valley Seed Library, and we were pleased to see the carrots are all different colors. Unfortunately, I really dislike carrots unless they are cooked to make them no longer taste like carrots. I think we will pickle these with some daikon radish and ginger.
After Hurricane Irene, Jeff and I were pleased to discover that our garden came out unscathed. Sadly, the copious amounts of rain the following week have. Over saturated our garden, and made a lot of our tomatoes and peppers rot on the vine. Even so, this years crop is much bigger than last years haul of a few dozen green tomatoes. This year so far we've had eggplant, carrots, bell and cherry peppers, pole beans, and tons of tomatoes. Each year we learn something new. This autumn we are excited to plant some seed garlic we got from the Vermont Garlic Festival. We'll see how things go!
Monday, August 15, 2011
Instant Vegan Gnocchi Recipe

Jeff and I are all about making things from scratch. But with our research work ramping up, the heatwave, and general laziness kicking in, we're trying to figure out a few shortcuts. One great idea we had was making gnocchi from instant potato flakes. We found some organic flakes sold in bulk at the amazing Honest Weight Food Co-op and bought a quart to try out.
This recipe is so easy that we don't even have to make a bunch and freeze it because it takes almost no time to make it in the first place! And all it takes is a bowl, spoon, hands and a fork to prepare.
Instant Vegan Gnocchi
Yields 2 servings
1 cup instant potato flakes (if you can, buy organic)
1 cup all-purpose flour
1 1/2 tbsp tapioca flour, Ener-G egg replacer, or dry egg replacer of your choice
1 cup water
- Prepare a medium-sized sauce pan with water over high heat to boil.
- In a medium-sized mixing bowl, combine the potato flakes, all-purpose flour and tapioca flour (or dry egg replacer of your choice).
- Add the water, and stir to combine. At some point you will want to start kneading with your hands. Continue to knead until everything is mixed.
- Remove teaspoon sized pieces of dough and roll into little balls. Optionally roll the balls over the tines of a fork (or if you're fancy, a gnocchi board) to obtain the trademark gnocchi ridges.
- Boil for 3-5 minutes until gnocchi is tender. They will float when they're done. Drain the pasta in a colander and serve.
Sunday, July 24, 2011
Super Easy, No Cook Vegan Ice Cream Recipe

I know I haven't posted in ages, I was just waiting for the perfect recipe to come my way. And when it rains, it pours. For now here is a recipe I invented during the beginning of the recent heat wave. I wanted ice cream, and didn't want to wait for it to cook and cool before putting it into my ice cream maker. Although it does require the turning on of a burner, it's very brief and doesn't add much to the prep time.
Super Easy, No Cook Vegan Ice Cream (Any Flavor)
Yields approx 3/4 - 1 quart
1 tbsp cornstarch + 1/2 cup soymilk
1 tsp flavor extract of your choice (vanilla or maple make great picks)
3/4 cup sugar
1 can coconut milk
1 1/2 cup additional soymilk
- In small saucepan, thoroughly whisk the cornstarch and 1/2 cup soymilk until completely mixed. Add the extract. Heat on medium/low until just simmering and the soymilk begins to thicken.
- Transfer the cornstarch/soymilk mixture to a mixing bowl and whisk in the sugar until dissolved.
- Add the coconut milk and additional soymilk to the mixing bowl, and stir everything together until fully mixed. (You do not have to worry about only skimming the cream from the coconut milk, just dump in the whole can!)
- Put into your ice cream maker and make as per your model's instructions. It may take a few extra minutes to fully form into ice cream due to the slightly warmer temperature of the mixture, plus the whole hot summer weather making indoors without A/C very hot. Don't worry, it'll be worth the extra few minutes!
- Enjoy!
By the way, the ice cream in the photo was flavored with maple extract, and as a topping I poured on some peaches in rum sauce, recipe from the Ball Complete Book of Home Preserving.
Friday, March 18, 2011
Recipe Roundup
 This is week fourteen of the weekly Recipe Roundup, where I post the online recipes I've used over the past week.
- Acorn squash quesadillas - Note: this is not a vegan recipe but is easily veganizable. Jeff and I made this with some homemade flour tortillas, and used Buffalo Mostarella from The Uncheese Cookbook instead of cow cheese. I liked the squash filling but I didn't think it was "taco" enough, it just didn't wow my tastebuds as much as most Latin inspired cuisine does. I think that would have been solved with salsa (as the recipe suggests and we didn't make) or guacamole. Also, this recipe made me realize how much more I like corn tortillas than flour. Finally, I wouldn't recommend using the Buffalo Mostarella cheeze with these quesadillas, as the flavor doesn't really meld with that of the squash filling. I think your favorite vegan cheezy sauce will probably do just fine if it's not too strong.
Check out previous Recipe Roundups: One, Two, Three, Four, Five, Six, Seven, Eight, Nine, Ten, Eleven, Twelve, Thirteen
Saturday, March 12, 2011
Switch to FeedBurner
I just switched Vegtopia to FeedBurner, I'm not sure if this will affect current RSS subscriptions. If you stop getting our updates, please change your subscription URL to: http://feeds.feedburner.com/vegtopia
Thanks!
And just so this post isn't so boring, here is a picture of delicious guacamole:

Thanks!
And just so this post isn't so boring, here is a picture of delicious guacamole:
Thursday, February 24, 2011
Vegan Energy Bars
Jeff and I have just started training for a 5-mile race that I've been running in since 2008. This actually entails quite a lot of running, and as we eat breakfast before running and lunch at the typical noon hour, we are left pretty hungry in the intervening hours. Instead of buying individually plastic wrapped processed bars, I decided to try my hand at making my own energy bars.
 I was surprised at how hard it was to make these, because most of the recipes online call for nuts (which I can't eat because of my braces) or peanut butter (which I don't eat because I don't like it). A lot of recipes called for corn syrup, which I find to be icky, or lots of coconut oil. So I decided I had better invent my own recipe, hoping that the end product would be soft enough to be braces-friendly, delicious enough to eat and filling enough to hold us over until lunch.
Fortunately, the resulting product did live up to all of my exacting requirements! Here's the recipe for you to try out at home:
Vegan Energy Bars
Yields 12 bars
1 cup dates, pitted
1 cup oatmeal (uncooked)
1 tsp vanilla extract
1/2 cup dried cherries (or dried fruit of your choice)
1 tsp cinnamon
2 tbsp maple syrup
2 tbsp water

I was surprised at how hard it was to make these, because most of the recipes online call for nuts (which I can't eat because of my braces) or peanut butter (which I don't eat because I don't like it). A lot of recipes called for corn syrup, which I find to be icky, or lots of coconut oil. So I decided I had better invent my own recipe, hoping that the end product would be soft enough to be braces-friendly, delicious enough to eat and filling enough to hold us over until lunch.Fortunately, the resulting product did live up to all of my exacting requirements! Here's the recipe for you to try out at home:
Vegan Energy Bars
Yields 12 bars
1 cup dates, pitted
1 cup oatmeal (uncooked)
1 tsp vanilla extract
1/2 cup dried cherries (or dried fruit of your choice)
1 tsp cinnamon
2 tbsp maple syrup
2 tbsp water
- Preheat oven to 350oF.
- Chop the dates as fine as you can, or process them in your food processor. (Mine pretty much just laughed at me and refused to chop the dates at all.)
- Process or mix together the dates with the oatmeal, vanilla, cinnamon and maple syrup.
- In a medium sized mixing bowl, mix together the above with coarsely chopped dried cherries and water.
- Spread this mixture evenly into a foil-lined 8x8 baking dish.
- Bake at 350 for 15 minutes.
- Allow to cool completely until cutting into bars. Store in an airtight container in the fridge.
Monday, February 21, 2011
Vegan Taco Pizza
Given the recipes on this blog, you would think that Jeff and I eat a lot of pizza. It's true, we do, because it's a great way to use up leftovers and it's usually pretty healthy as we rarely ever use processed vegan cheeze. I'm also a terribly picky eater, so if you can put it on a pizza I'm much more likely to try it!
Jeff and I had a glut of snack foods left over after our Superbowl Snack-a-Thon (no, we didn't actually watch the game) so we decided to revive a recipe I first made back in 2006 when I first went vegetarian: Taco Pizza. The idea behind taco pizza is simple, take your favorite taco fillings and use them on a pizza, substituting beans for the sauce layer to prevent the juicy salsa and other toppings from getting the dough too wet.

Vegan Taco Pizza
Yield: one hearty pizza
1 pizza dough (Jeff uses a recipe he has altered from the Joy of Cooking)
1/2 can of refried beans (or about 1 cup homemade refried beans)
Generous serving of salsa
1 medium red onion, sliced
1 jalapeno pepper, sliced and seeded
1 serving seitan or okara meatballs
Vegan cheeze of your choice (we used Vegan Gourmet in this instance but we mostly just make some sort of cheezy sauce to pour on top)

Jeff and I had a glut of snack foods left over after our Superbowl Snack-a-Thon (no, we didn't actually watch the game) so we decided to revive a recipe I first made back in 2006 when I first went vegetarian: Taco Pizza. The idea behind taco pizza is simple, take your favorite taco fillings and use them on a pizza, substituting beans for the sauce layer to prevent the juicy salsa and other toppings from getting the dough too wet.
Vegan Taco Pizza
Yield: one hearty pizza
1 pizza dough (Jeff uses a recipe he has altered from the Joy of Cooking)
1/2 can of refried beans (or about 1 cup homemade refried beans)
Generous serving of salsa
1 medium red onion, sliced
1 jalapeno pepper, sliced and seeded
1 serving seitan or okara meatballs
Vegan cheeze of your choice (we used Vegan Gourmet in this instance but we mostly just make some sort of cheezy sauce to pour on top)
- Preheat the oven to 400oF.
- Roll or toss the pizza dough onto a pre-cornmealed baking sheet.
- Spread the refried beans over the dough, leaving a bit of space around the edges for crust.
- On top of this, add salsa, onion, pepper, seitan, and any other delightful taco topping of your choice.
- Grate or pour cheeze over top to cover.
- Place pizza in preheated oven for 15-20 minutes until crust is golden brown.
- Remove pizza from oven and slide onto a wire rack.
- Let cool for 5 minutes before cutting on a solid surface.
- Enjoy!
Saturday, February 19, 2011
Recipe Roundup
This is week thirteen of the weekly Recipe Roundup, where I post the online recipes I've used over the past week.- Turnip and Potato Patties - This is not a vegan recipe, we just used some chickpea flour instead of egg. Jeff and I have a glut of turnips and don't know what to do with them. Honestly, we found this recipe to be a little gross. Too much grease and not enough flavor.
- Chocolate Mousse - Jeff made this for me for Valentine's Day. (I made him a chocolate cake from the Hot Damn and Hell Yeah cookbook. In a word: delicious!
Check out previous Recipe Roundups: One, Two, Three, Four, Five, Six, Seven, Eight, Nine, Ten, Eleven, Twelve
Subscribe to:
Posts (Atom)